Follow these
simple guidelines to comply with the law and keep Swifts
safe and breeding in your roof

Holes cut in the facing
boards let the Swifts reach their nests
in the eaves of this chapel Photo
© Mark Glanville
|
Follow these rules when working
on roofs where Swifts are nesting
1.
Do not work on the roof while the Swifts are
nesting (May to August)
2. Leave existing Swift
nest places undisturbed by any works
3.
Preserve the Swifts' access holes or make new
ones to match the
old ones exactly
|

Swift entering a
roof via a displaced pantile. It is nesting on the roofing
felt below Photo
© Bill Ball
|
Repairing & renewing roofs without destroying
nests
Repairs
and re-roofing
are unavoidable, but where
there are Swifts nesting it usually means the end for
them breeding there. The new roof almost always denies
them access to the holes, crevices and open eaves where
they used to nest, and then the colony is finished.
This is happening at an alarming rate all over the UK
and Europe. The result is we are losing our Swifts fast;
35% have vanished from South East England in the past
ten years alone, never to return as there are ever fewer
places left for them.
But it doesn't have to
be like this. With just a little foresight, planning
and care you can preserve the Swifts' nest places for
them and you and your children can revel in their
flight and calls for ever after.
Below
we
show you how to keep Swifts breeding safely in your
building. NB
please remember that any interference with the Swifts,
their nests or their eggs and chicks is an offence under
both UK and EU legislation.
Where
the Swifts will be nesting
 Eaves - in "open" eaves, under the bottom
row of tiles, above the gutter, just inside the roof-space
Eaves - in "open" eaves, under the bottom
row of tiles, above the gutter, just inside the roof-space
Holes - in holes in walls where pipes have been removed
Flashings - on brick ends or in holes under loose flashings on chimneys and skylights
Gables - behind barge boards and gables, on the brick
ends
Tiles - under loose or displaced tiles, on the roof
timbers or felt
Pointing - in voids behind gaps between stones or bricks where the
pointing has washed out
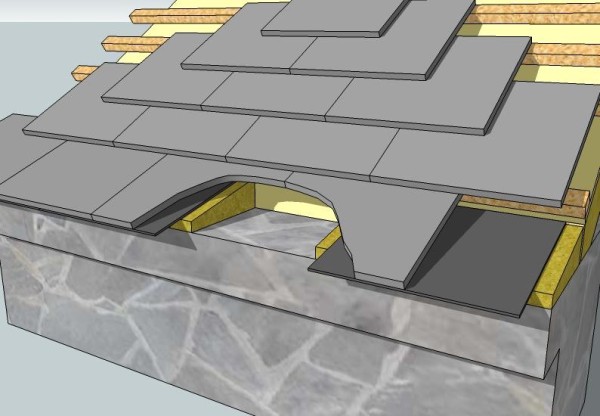
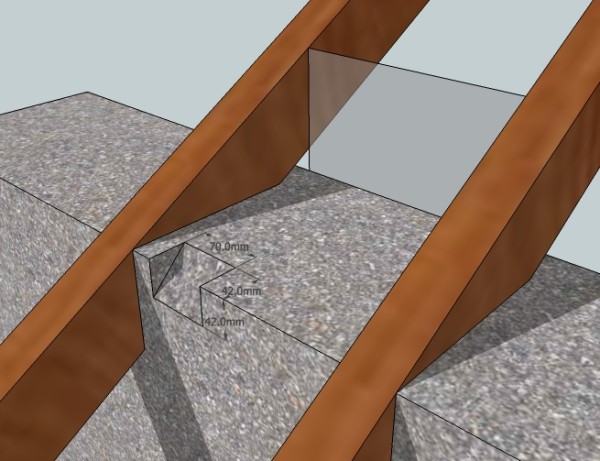
How
to save their nests and let them breed safely
The drawings below
shows an artist's impression of how the eaves of traditional
houses can be converted to provide secure, separate accommodation
for Swifts to make their nest places in. The left drawing
also shows "Ibstock Eco Homes for Swifts"
(a type of Swift Brick) installed in the wall
below the eaves. This is a practical and cost-effective
option where walls are being built or repaired. Drawings
© Dick Newell
Never re-roof where and when there are Swifts nesting
(usually end of April to beginning of August)
Eaves nests- leaving the eaves open is the simplest
& best
solution or cut slots in the soffit or facing boards
to match the old entrances
If you have to, install a ventilated
plywood partition at least 30cm inside the loft to enclose the Swift
nest areas and make the loft area usable - click here
 to
learn more about this technique to
learn more about this technique
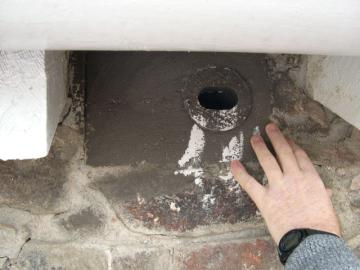
Hole nests - where they are not going
to be a problem just leave old holes. You can fit
a tile into the pointing above to form a ledge to keep the rain out,
or else fit a Swift Brick to provide an alternative
nest place
Behind flashings - offset or lengthen flashings and ridge/end
tiles to let the Swifts back in without affecting weatherproofing
Inside gables - either leave well alone or else fit simple wooden nest places behind the
barge
boards
Under tiles - reinstate the tiles keeping the old gaps where
the Swifts gained entry exactly
where they were
Inside voids behind defective pointing - just leave un-pointed the access
to
where the Swifts are nesting
NB
- don't treat the Swifts' area with insecticides or
biocides - it may harm them.
If
none of the above are possible - consider nestboxes
instead Click on the Swift to find out more!
Some
examples
|

|
LEFT
- Swifts breed inside the eaves
of this hotel
at the Escorial, in Spain.
Access slots (seen as dark lines at
the top of the wall) are left free for them
to enter and also ventilate the roof
space.
RIGHT
- Swifts nest under the tiles on
the brick ends of this roof. Repairs
would evict them, but leaving the
bricks as they are and fitting deeper tiles,
offset to maintain the Swifts' access from
below,
will provide weather proofing and let
the Swifts nest.
Photos
© Edward Mayer & GBN Nederland
|

|
|

|
LEFT
- A Swift nest on a gable brick end, exposed
when the barge boards were removed. Swifts
can nest in very restricted places.
RIGHT- The gable brick ends shown exposed on
the left
have been fitted with bargeboards containing
staircase type nest boxes. These will be
faced with a plank with entrance holes cut
for the Swifts to access the new
nest places inside.
Photos
© Graham Roberts / SOS
|

|
|
|
LEFT
- A Schwegler "Swift Brick" inserted into previously open eaves
to provide a replacement Swift nesting
place. The roof of this NHS hospital
had to be sealed to meet hygiene requirements,
but the Swifts' nests were saved.
RIGHT
- Plastic soffits and gutters have been
fitted to this re-roofed house. Holes have
been cut in the soffits close to the wall
to provide access for the Swifts to their
nests in the eaves.
Photos
© Raymond Fulton & Julian Dowding
|

|
 Roof Repairs and Re-Roofing with Swifts - click
to download our
guidance leaflet. This
is a PDF file and needs Adobe® Reader™ to open - download it
here
Roof Repairs and Re-Roofing with Swifts - click
to download our
guidance leaflet. This
is a PDF file and needs Adobe® Reader™ to open - download it
here 
 Need advice? For more information contact
Swift Conservation
Need advice? For more information contact
Swift Conservation
Next
- Installing
Swift Nest Places  Back to Contents Back to Contents
|
 Roof Repairs & Re-Roofing